
Grasshoppers of Wyoming and the West
Entomology
Grasshopper Collections and Survey
Common-Scientific Names of Grasshopper Food Plants
A well-curated collection of local grasshoppers is useful for identification and display. Insect taxonomists often identify species by comparing unknown specimens with identified museum specimens. They also make comparisons to confirm identifications that they have made from memory or by the use of a "key." These practical uses of an insect collection can also be made by plant protection personnel.
Neatly pinned and completely labeled grasshopper specimens placed in a glass-covered museum drawer make an effective educational display. Visitors —farmers, ranchers, and others — are amazed to learn that there are more than a few kinds of grasshoppers and that many kinds of grasshoppers may actually inhabit their properties. The observation of various species of grasshoppers in a collection reveals the wide diversity within this family of insects.
An interesting and useful grasshopper collection can be made with little effort and at modest expense. Anyone can capture a variety of grasshoppers within the confines of a single county by hunting for them in different habitats and at different times from spring until fall. The equipment needed to capture, preserve, label, and store grasshopper specimens consists of several simple items: (l) insect net, (2) killing jar, (3) insect pins, (4) spreading board, (5) insect boxes or museum drawers, (6) insect trays, (7) pinning block, and (8) label-making materials (paper, crow quill or rapidograph pen, India ink, and scissors).
The standard insect net (15-inch diameter) fitted with a nylon netting bag is suitable for catching grasshoppers (Fig 13). A short handle (2 feet) makes the insect net convenient for sweeping in a semicircle close to the ground as one walks at a moderate speed over rangeland or in a disturbed area. This procedure is good for capturing nymphs and slower flying adults. Adults of certain species, however, are wary and easily frightened and may fly away. An adult of such a species must be captured by visually following its flight, watching where it lands, approaching it stealthily, and then slapping the net over it. It will usually jump or fly up into the net. Then it may be extracted by hand.
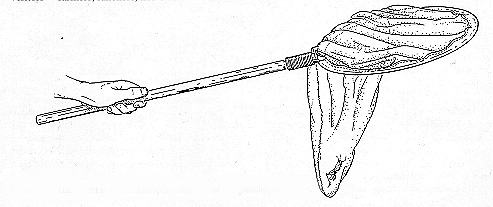
Figure 13. The insect net is an indispensible tool of the grasshopper scout.
A second method of sweeping for grasshoppers, with the objective of obtaining a sample of all species inhabiting a site, is to take a set of 10 sweeps close to the ground while walking slowly and then a set near the tops of vegetation at a fast walk. Repeat this procedure as necessary to obtain adequate numbers of specimens from the site. A desirable number of specimens from a site ranges from 100 to 150.
For good museum specimens, fill up the net sparsely with grasshoppers, taking a few sweeps at a time (i.e., 10-25 sweeps). For other purposes, however, such as determining relative density by the sweeping method, as many as 100 sweeps may be taken at one time.
Make collections of grasshoppers from one habitat at a time and keep specimens from a single habitat separate from specimens taken in other habitats. This procedure makes possible brief label descriptions indicating the specimen’s habitat.
Scouts need to obtain absolute density of grasshoppers (number per square yard) at each surveyed site as well as to collect specimens for determination of species composition. The method consists of counting the number of grasshoppers in a series of 1 square foot areas. Scouts visualize a sample area approximately 15 to 20 feet ahead and on their approach carefully count the number jumping or flying out. When they arrive at the selected square foot area, they run their hands through the vegetation to flush and count any remaining grasshoppers. By walking out at least 50 feet from the road and making the counts in a wide circle, the scouts ensure that samples are taken in typical rangeland habitat. Eighteen 1-square-foot samples are taken and recorded. Scouts add the numbers counted in each square, then divide the total by two to obtain the absolute density in number of grasshoppers per square yard. Detailed instructions for grasshopper survey and recording are provided by the APHIS office in each western state.
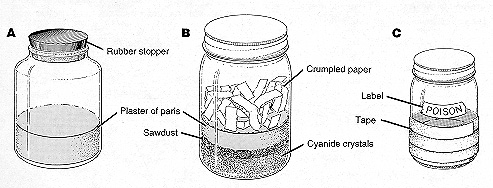
Figure 14. Types of killing jars. A, ethyl acetate saturated in plaster of paris; B, potassium cyanide crystals in bottom of jar; C, complete jar with protecting electrical tape and poison label.
There are several ways to kill captured grasshoppers. Killing jars can be made from wide-mouthed pint or quart jars (Fig. 14). To make an ethyl acetate jar, pour about 1 inch of plaster of paris mixed with water into the bottom of the jar and allow the plaster to dry with the lid off. Then add enough of the ethyl acetate to saturate the plaster, pouring off any excess. Whenever the ethyl acetate becomes spent or weak, recharge the jar with more. Another kind of killing jar contains potassium cyanide as the toxic agent. To make this type, pour one-half inch of potassium cyanide crystals into the bottom of the jar. Cover the crystals with one-fourth inch sawdust and then one-fourth inch thick paste of plaster of paris. Add crumpled absorbent paper to prevent condensation of water on the jar’s inside surface. When ready to use, put several drops of water on the plaster. In one hour enough hydrocyanic fumes will be generated inside the jar to kill any grasshoppers placed there. To retain color of specimens, do not leave them in a killing jar much longer than it takes to kill them. For prevention of breakage and for safety, wrap the lower half and bottom of killing jars with electrical or packing tape and attach a conspicuous POISON label (Fig. 14C). Biological and entomological supply houses have improved killing jars over the home-made ones described in this bulletin. These can be purchased at reasonable prices and come with directions for charging them with recommended killing agents.
A third effective way to kill grasshoppers is to dunk them into ethyl or isopropyl alcohol for two to three minutes while they are still confined in the net. Drain and transfer them to a clean jar with absorbent paper and place the specimens in the jar in a cooler until you return to headquarters. You may then transfer specimens killed by any of the suggested methods to a refrigerator or to a deep freeze to store for periods of more than three days.
After each collection separate all of the grasshoppers from plant material such as grass seeds and pollen, which get into the net as one sweeps the vegetation. Place the grasshoppers in a heavy duty ziploc freezer bag (such as one 5x7 inches, 2.7 mils thick), gently roll the bag of grasshoppers and place it in another bag with a complete label (location, date, collector’s name, etc.). Placing the label in the second bag prevents grasshopper exudates from staining it and making it illegible. Put the double-bagged grasshoppers in a cooler charged with ice or a container of frozen blue ice. To prevent soaking of the bagged grasshoppers from melting ice water, set them in a plastic container resting on the ice. At the end of the day, place the collections into a deep freeze until they can be transported to headquarters. To prevent thawing of grasshoppers when they are transported, place them in a plastic container with a tight lid in the center of an ice-filled cooler and add salt. This procedure will usually keep the grasshoppers frozen for a day or longer. These precautions are designed to retain specimens in the best condition possible for accurate identification at a later time.
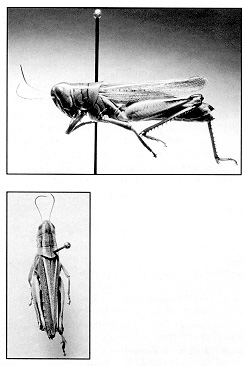
Figure 15. Photographs showing correctly pinned grasshopper. A, grasshopper level and spaced half inch from pin head; B, pin piercing right side and rear of pronotum.
The correct pinning of a grasshopper is essential in preparing a good museum specimen (Fig. 15). Use a No. 3 or 4 insect pin and for a very large grasshopper, use a No. 7 insect pin. An ordinary straight pin will not do, as it is too short and thick and prone to rust. Holding the grasshopper in one hand and the pin in the other, pierce the top of the pronotum on the right side and near the rear edge. Leave one-half inch of the pin above the specimen for safe handling of the specimen later when it has dried. As you push the pin through, keep the grasshopper oriented so it is level and not tilted on the pin in any direction. If you have erred, the pin can be withdrawn and run through again starting in the hole already made. Because the hindwings of bandwinged grasshoppers possess taxonomic characters, spread the left forewing and hindwing by mounting a few males and females on a spreading board (Fig. 16). Leave the specimens on the spreading board for a few weeks while they dry.

Figure 16. Grasshoppers drying with left wigs spread. left, view of whole spreading board, 19 x 7.5 inches; right, coseup of drying grasshoppers on spreading board.
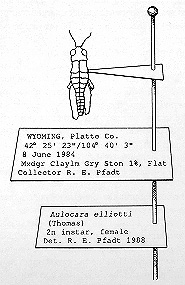
Figure 17. Nymphal grasshopper glued to card point and fully labeled. Dimensions of reduced top label on actual specimen 1 x 3/8 inch, reduced bottom label 7/8 x 2/8 inch. Note content and style of labels.
Pin the larger nymphs on No. 1 size insect pins but glue smaller nymphs to paper points (Fig. 17). With a hand punch, make the paper points from unlined index cards. Place a small amount of a Duco-type cement on the pointed end and mount the specimen on top of the cement. To ensure retention of color of pinned grasshoppers, place them in a deep freeze for several months to dry. Nymphs particularly require this freeze-dry method. Adults can be exposed to the air of a room in an open box to dry. During a wet season or in a humid climate, one should place mounted specimens in a Schmitt box (Fig. 18) with desiccating granules (6-12 mesh) of silica gel. Under any condition of humidity the practice will serve to retain life colors of the grasshoppers. This method requires the box with specimens and granules to be closed.
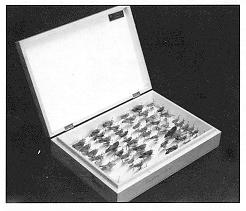
Figure 18. The schmitt type insect box. It has a polyethylene foam pinning bottom and is nearly airtight with lid closed.
Once specimens are dry they are fully preserved, but need protection from ants and from larvae of dermestid beetles that feed on them. Place balls or flakes of paradichlorobenzene (PDB) or naphthalene in a small cloth bag and pin firmly in the corner of the insect box or drawer. A more effective insecticide is dichlorvos. Cut three-fourths inch squares from No-Pest Strip insecticide. Pin one square per box or drawer of specimens. A square will protect for as long as a year before it must be replaced. Many priceless collections made in the 1800s and more recently have been destroyed by dermestids.
Large grasshoppers such as the differential and the lubber do not dry fast enough to make good museum specimens. They decay and discolor. They must be eviscerated before pinning by making a one-half inch cut lengthwise in the bottom of the abdomen (center of first three sterna) with a pair of small scissors. With a fine pair of forceps reach into the inside and extract the entrails. Replace entrails with a small cotton wad and bring cut sides of integument together. The operation will allow a large grasshopper to dry quickly. One may further ensure good preservation by placing specimens in a Schmitt box with a desiccant.
Safe storage of grasshopper specimens requires nearly airtight insect boxes or museum drawers. These are manufactured in standard sizes with hard bottoms or polyethylene foam pinning bottoms. Dimensions of insect boxes measure 9 x 13 x 2 1/2 inches (Fig. 18) and Cornell drawers 19 x 16 1/2 x 3 inches (Fig. 19). It is convenient to use insect pinning trays in museum drawers (a necessity in drawers with hard bottoms) so that specimens can be shifted around. Trays come commonly in three sizes: large 4 3/8 x 7 1/4 x 1 5/8 inches, medium 4 3/8 x 3 5/8 x 1 5/8 inches, and small 4 3/8 x 1 13/16 x 1 5/8 inches. Large and medium sizes are usually used for grasshoppers, but small trays can also be helpful on occasion.
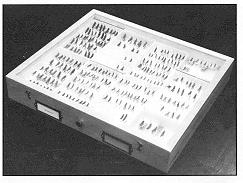
FIgure 19. The Cornell type insect drawer. It has a glass cover and contains three sizes of insect pinning trays for ease of handling groups of grashopper species.
For a museum specimen to have value it must bear fully descriptive labels, either two or three depending on division of information. In the two-label system, the top label gives the state and county in the first line, the latitude and longitude of the collecting site in the second line, the date of collection in the third line, the habitat in the fourth line, and the collector’s name in the fifth line. For collectors who do not have available a global positioning apparatus, an equally good way to specify the location of the collection site is to use a county map from which the township, range, and section may be obtained. The second line of the top label in Fig. 17 would then read T28N R65W Sec 4 SE. Do not abbreviate the year, list fully (e.g. 1994). Your specimen may rest safely for centuries in a museum collection. Provide a short description of the habitat such as the examples shown in Table 6.
TABLE 6. Examples of short descriptions of grasshopper habitats. Abbreviate one of A, B, C, and D on label*.
A.Vegetation
Annual grassland
Bunchgrass prairie
Desert grassland
Mixedgrass prairie
Shortgrass prairie
Tallgrass prairie
Desert shrubs
Mountain meadow (below timberline)
Alpine meadow (above timberline)
Crop (name crop) dry or irrigated
Crop border (name crop)
Improved pasture (name forages)
Reversion (name plants)
Roadside (weeds or grass or mixed)
B.Soil texture and color
Clay,Gray
Clay loam,Yellow
Loam,Brown
Silt loam,Red
Sandy loam,Black
Sand
C.Soil surface
Stony %
Rocky % (outcrops)
D.Slope
Swale
Flat
Rolling
North slope
South slope, etc.
Hilltop
*See top label of Fig. 17 for suggested style. For more precise descriptions of vegetation types and soil classifications, consult with local botanists and soil scientists.
In specifying the habitat, a general classification of the grasslands of the West is helpful (Fig. 20).
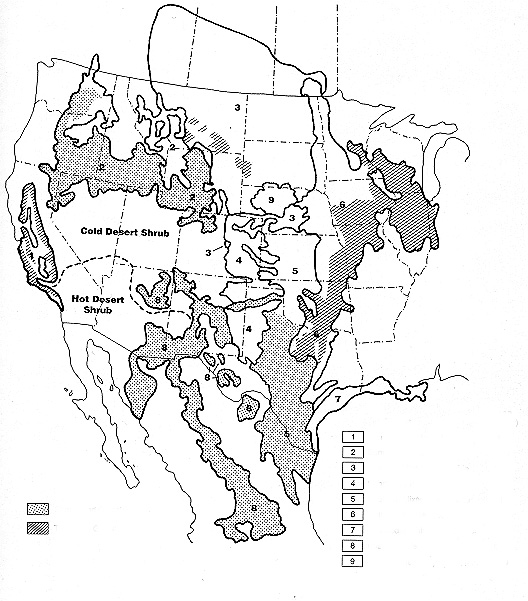
Figure 20. Map shows location of the three kinds of grasslands in North America and the cold and hot deserts dominated by shrubs but also containing sparse grasses (adapted from a map of Grasslands of North America by Dodd, 1982).
Grasshopper Collections and Survey Contents
Whenever possible one should also indicate soil texture (sandy, loamy, clayey), color, stoniness (gravel) and rockiness (rock outcrop), and slope or relief (hillside, hilltop, flat, swale). For a detailed treatment of soil classification consult the Soil Survey Manual USDA Handbook 18 (1951). The majority of counties in the United States have published soil classifications that may be obtained from the Soil Conservation Service located in each county seat. One may then enter the soil name on the label. The bottom label gives the scientific name of the specimen, the author, the name of the person who made the identification, and the year in which the identification was made. In the three-label system, the collector’s name is placed on a separate label and is positioned in the middle between the top and bottom labels. See Figure 17 for the recommended style. Use quality, heavyweight paper for labels (white paper with high rag content). Print labels with a crow quill or rapidograph pen using black India ink. If a typewriter and copy machine are available, one may type the data and reduce the information to small but legible labels. Or if a computer and laser printer are available, one may type the label and have the printer reduce it to the desired size. For a large series of specimens, printed labels may be ordered from a commercial company. Do not make labels too large. A maximum size of 1 x 3/8 inch is recommended. It is preferable, however, to exceed this when pertinent data need to be given. The labels of a specimen may differ in size so that only the size needed for the information is required of each label. Use a pinning block (Fig. 21) to make label levels uniform on all pinned specimens.
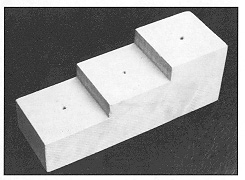
Figure 21. Insect pinning block used to make level of label uniform in the three label
system.
A word of caution here. Collectors often become enthusiastic about capturing grasshoppers
and leave themselves insufficient time to curate what they have caught. Leave yourself
enough time to pin, spread, and eviscerate specimens. Label at least one of the group
with all information available. Later, label all specimens. More detailed instructions
on techniques for collecting, pinning, preserving, and also shipping to specialists
are provided in USDA ARS Miscellaneous Publication Number 1443 (1986).
Live grasshoppers are frequently requested by researchers. These can be mailed in a variety of containers. An easy and practical way is to obtain squat paper or plastic pint containers (like the containers for cottage cheese). These may be purchased from a market or department store. Depending on size of the grasshoppers, from 10 to 25 individuals may be caged in a pint container along with a small amount of plant food such as lettuce. Do not overload the container with green food and do not place dry cereals in the container. Punch small holes in the lid and secure with tape. Untaped lids may come off in transit, allowing grasshoppers to escape into the packing material with fatal results. Place the containers in a cardboard shipping box surrounded by packing material and ship by US Express Mail, Federal Express, or overnight United Parcel Service. /p> <
Grasshopper Collections and Survey Contents
The University of Wyoming has earned its Research Level 1 (R1) status from the Carnegie Classification of Institutions of Higher Education, placing Wyoming's only four-year university with the top research universities in the United States.