
word documents
Word documents are commonly used across campus for everything from instructions to forms. Making them accessible, benefits users who rely on assistive technologies like screen readers. These tools allow users to navigate your content efficiently — but only if accessibility features like headings, alt text and structured tables are used. Creating accessible Word docs ensures that all users, including screen reader users can read, navigate and understand your content.
When building a Word document, it’s important to structure your content so that screen readers and other assistive technologies can interpret it correctly.
Steps to create accessible Word documents:
A well-structured document helps users with low vision or screen readers navigate content more easily. Screen readers allow users to jump through a document using headings, but this only works if the document uses Word’s built-in heading styles.
After opening a Word document that contains a large amount of text, sighted users frequently scroll the page quickly and look for some type of heading structure to get an idea of the layout and Screen readers and other assistive technology users have the ability to navigate Word documents by heading structure, as long as the author has included Word's Heading styles.
To do this:
- Use Heading 1 for your main title, followed by Heading 2 for sections and Heading 3 for subsections.
- Avoid skipping heading levels (e.g., don’t go from Heading 1 to Heading 4).
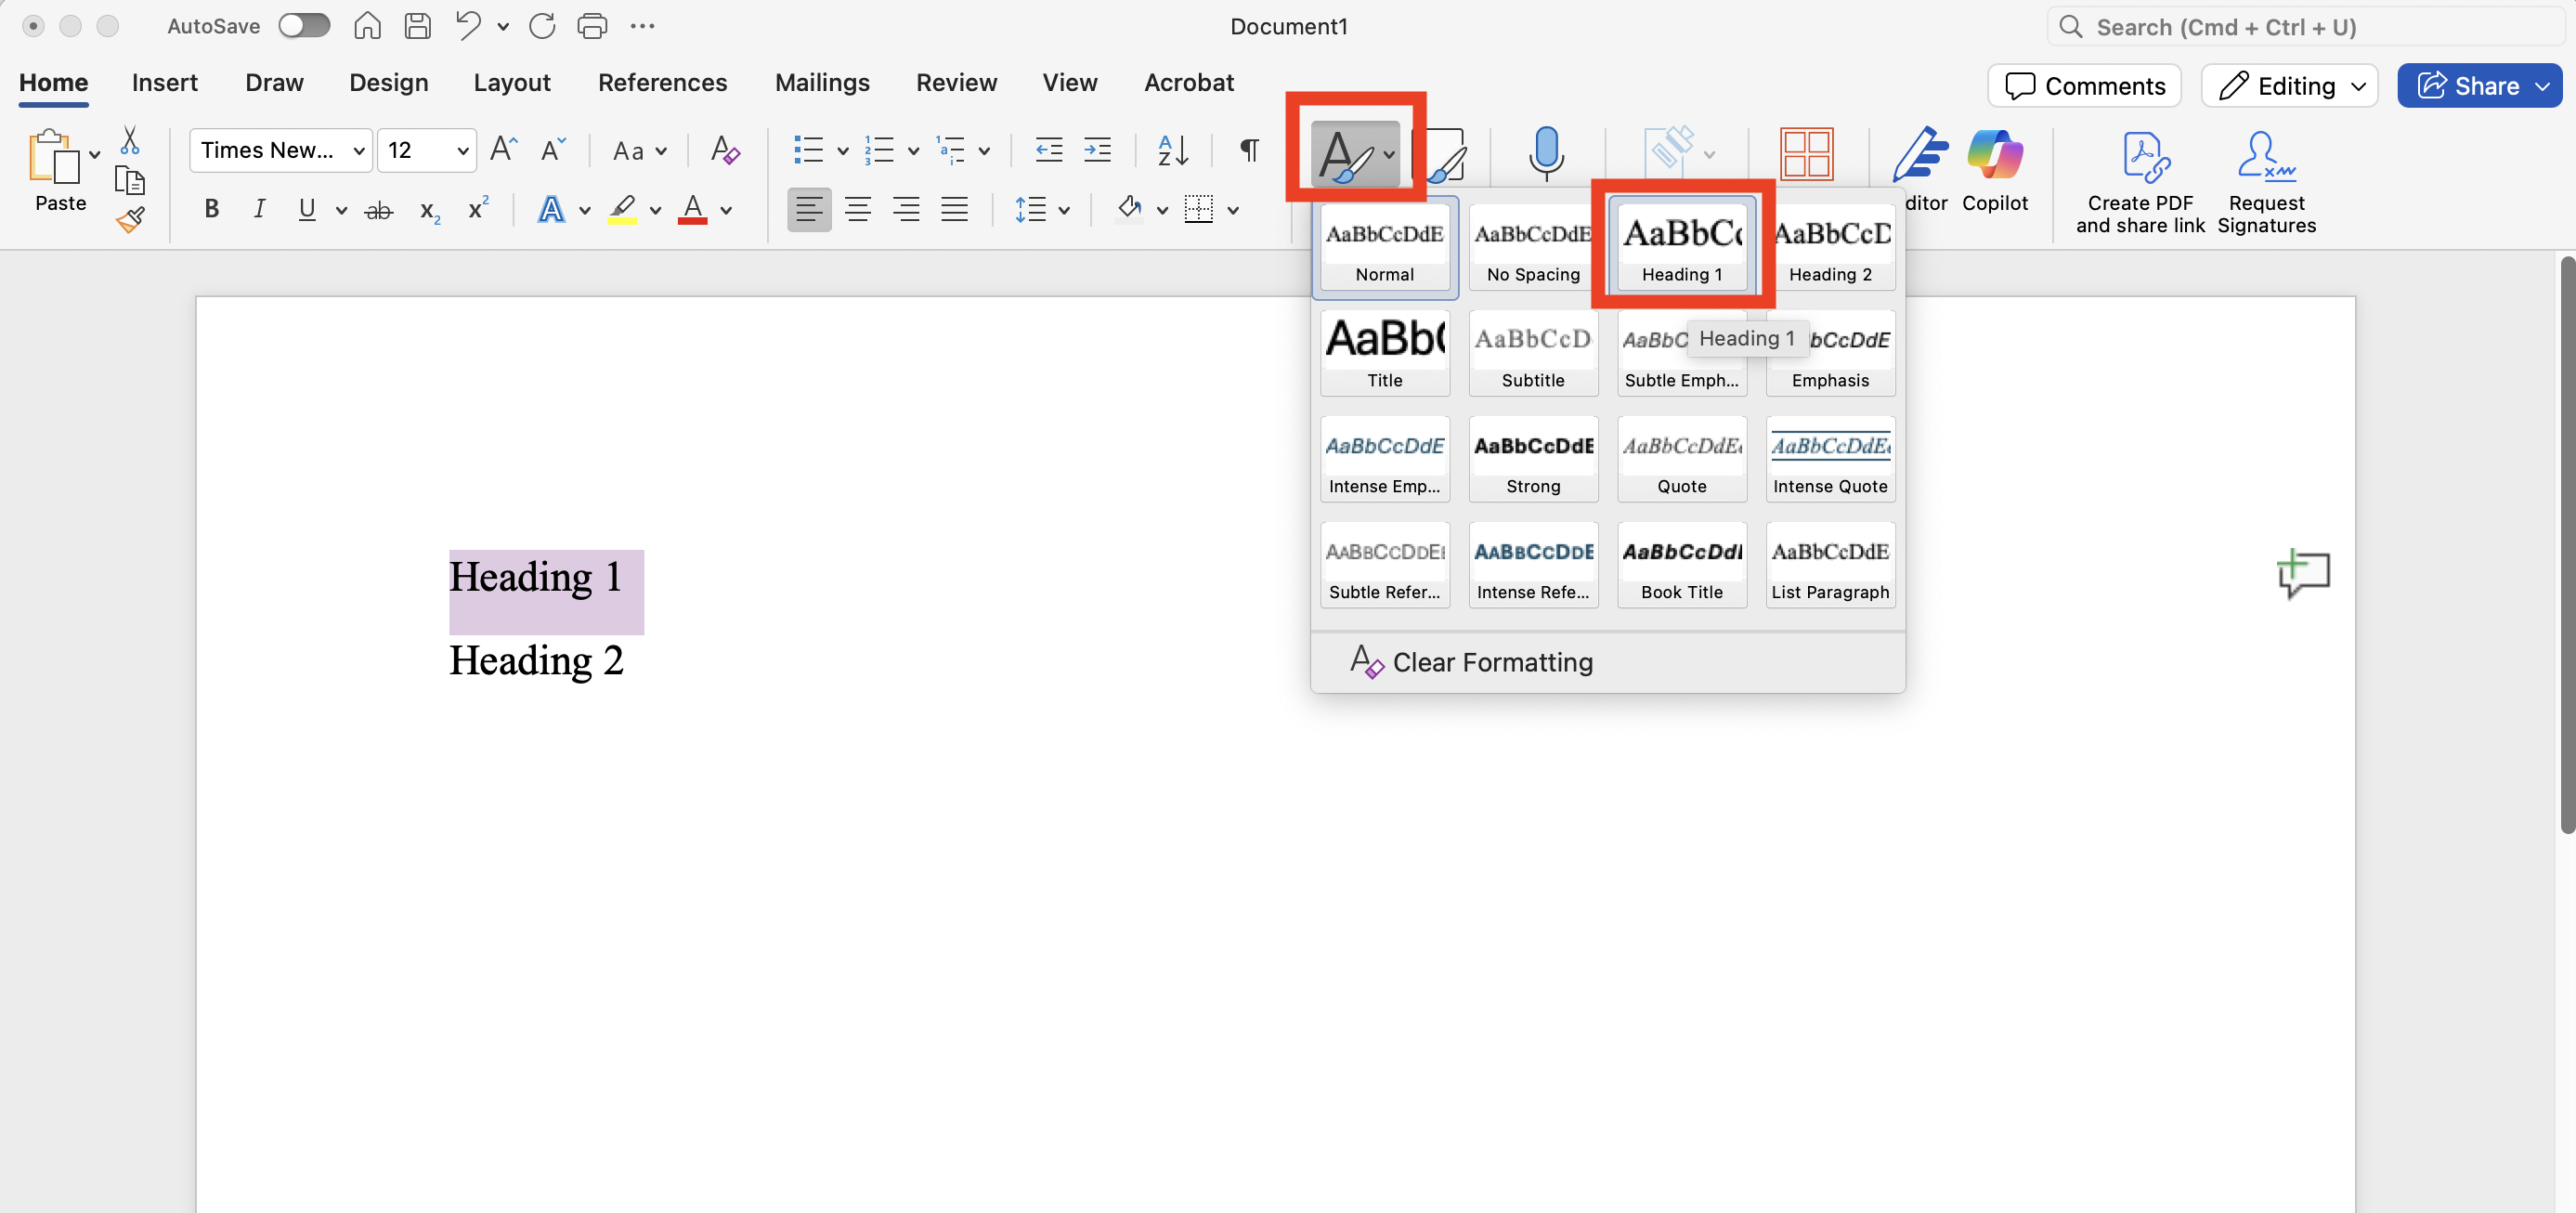
- Highlight the heading text and select a style from the “Home” tab under the “Styles”
group.
Alternate or “alt text” describes the meaning or function of an image. This allows screen reader users to understand what’s being communicated visually.
Alternate text should be included for:
- Pictures
- Illustrations
- Images of text
- Shapes
- Charts
- Smart or clip art
- Embedded objects
To add alternate text, right-click on the image > “View Alt Text”
Enter a brief, meaningful description
Hyperlinks in Word documents provide a way for users to visit web pages, navigate to word headings, bookmarks and open email links.
Hyperlinks are usually created in Word by pasting the complete URL of a web page into a document and hitting Space, Enter or some other key. Word automatically creates a link and uses the URL as the display text (e.g.,https://www.uwyo.edu). Because the URL text may not be intuitive to a user, it is recommended to edit Word's default link text. For example,Visit the University of Wyoming online!
Follow these principles to create accessible links:
- Use descriptive link text that does not rely on context from the surrounding text.
- Keep the amount of text in the link to a minimum.
- Use underlined text with a color that stands out from the surrounding text. By default, Word will underline the link in another color.
- Screen readers may scan a document by navigating from one link to another. It is best
to avoid vague link text that is tough to understand out of context (e.g., "click
here").
Be mindful when using tables. Word has limitations for making them accessible. The purpose of tables is to format information in tabular form. The columns or rows should show the meaning of the information in the table.
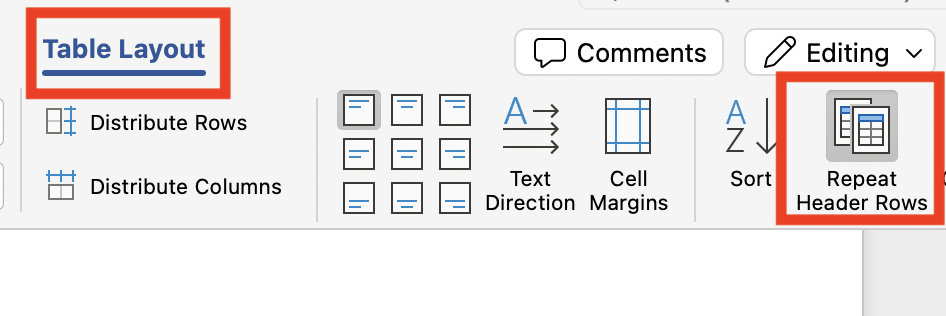
- The first row in a table can be designated as the header row. This provides a screen reader with additional information when the document is exported to PDF.
- Keep tables simple and avoid merged cells.
- Use “Header Row” and repeat on each page.
Lists and columns add important tiered structure to a document and should be built using Word’s tools for unordered and ordered or numbered lists. Avoid creating lists and columns manually by using tabs to indent content. Although this can provide a visual structure for sighted users, it does not create a sufficient guide needed for assistive technology.
Word has a built-in Accessibility Checker that can identify common issues and offer suggestions.
To run it:
- Go to the “Review” tab and click “Check Accessibility.”
- The pane will show errors, warnings, and tips (Insert Screenshot: Accessibility Checker
open in Word)
All benefited employees and students have complimentary access to LinkedIn Learning. You can utilize this platform and watch this video which provides a guide to create accessible Word document.
powerpoint presentations
Accessible PowerPoint presentations ensure all users can navigate and understand your slides, whether they are using screen readers or viewing in different modes. Accessible slide decks help all users better understand and engage with your content.
It is always better to start with PowerPoint’s built-in slide layouts rather than adding text boxes manually.
Steps to create accessible PowerPoint presentations:
Using default slide layouts ensures that text elements follow a logical structure and reading order. Avoid adding text boxes manually.
To apply a layout:
- Go to the “Home” tab and select a layout from the “Layout” dropdown.
As with Word, screen readers rely on alt text to describe visual elements.
To add:
- Right-click on an image or chart and choose “View Alt Text.”
- Enter a meaningful description.
PowerPoint may not always read content in the order it appears visually. Use the Selection Pane to reorder slide elements.
To access:
- Go to “Review” > “Check accessibility” > “reading order pane.”
Each slide should have a unique, descriptive title to help users navigate with screen readers or outlines.
Go to the “Review” tab and click “Check Accessibility” to see and fix issues.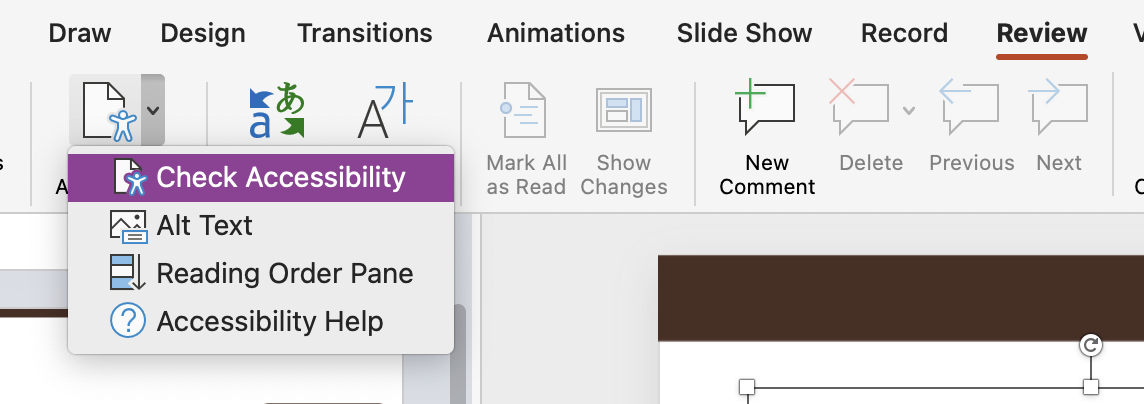
All benefited employees and students have complimentary access to LinkedIn Learning. You can utilize this platform and watch this video which provides a guide to create accessible PowerPoint presentation.
PDFs are the most frequently shared documents across campus. To be accessible, they must work with screen readers and keyboard navigation. Unlike Word or PowerPoint files, PDFs are difficult to edit once they are created. To ensure your PDF is accessible to everyone, you should focus on Source File Accessibility—making sure your original document is perfect before you convert it. To "Fix" most accessibility issues in the PDF, you will need to have access to Adobe Pro.
The "Source First" Rule
Always start with an accessible Word or PowerPoint document. If your source file is
accessible, your PDF will be too. Most accessibility issues can be fixed for free
within Microsoft Office before the PDF is even created.
Important: Do not use the "Print to PDF" option, as this creates a flat image and removes all accessibility tags and headings.
Steps to create accessible PDF document:
If you have used the Accessibility Checker in Word or PowerPoint and fixed all errors, follow these steps to ensure those fixes stay in your PDF:
- Windows: Go to File > Save As. Choose PDF as the file type. Select "Options" and ensure "Document structure tags for accessibility" is checked.
- Mac: Go to File > Save As. Choose PDF as the file type. Select the radio button that says "Best for electronic distribution and accessibility."
Result: This creates a "Tagged PDF" that screen readers can understand without needing any further fixes in Adobe.
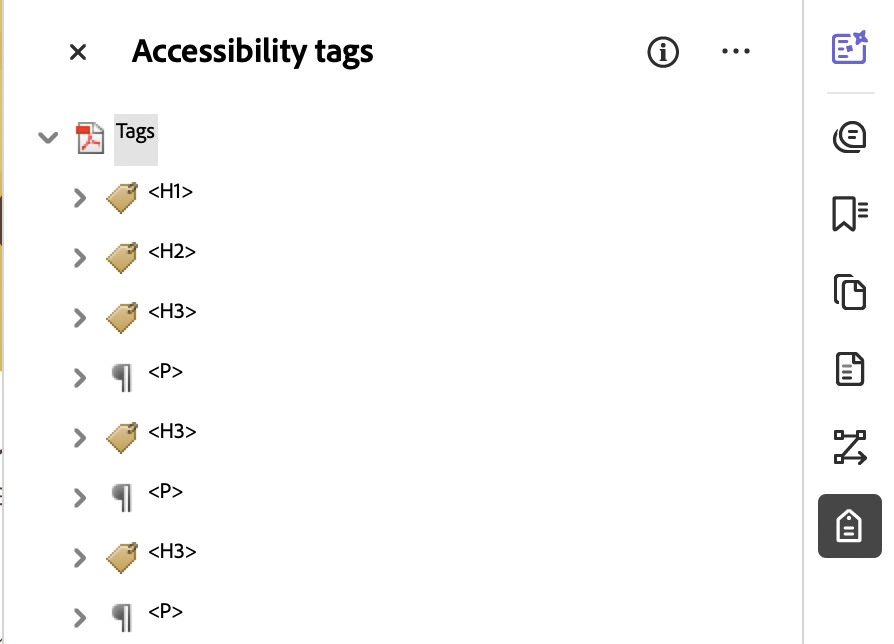
To be accessible, a PDF must be tagged. Tags are the behind-the-scenes structure that tells assistive technology what is a heading, paragraph, list, table or image and in what order to read it.
What to check (3 quick checks)
Do tags exist?
In the Tags panel, you should see a “Tags” root and a structure underneath it. If you see “No tags available” the PDF is not tagged.
Do tags make sense?
Look for a mix of items like headings and paragraphs (for example: headings and paragraph tags, lists and figures for images). If everything is one large block, the structure may not be usable.
Is the reading order logical?
Tags should follow the same order a person would read the page (top to bottom, left to right). A PDF can have tags and still have the wrong reading order.
How to open the Tags panel (current Acrobat)
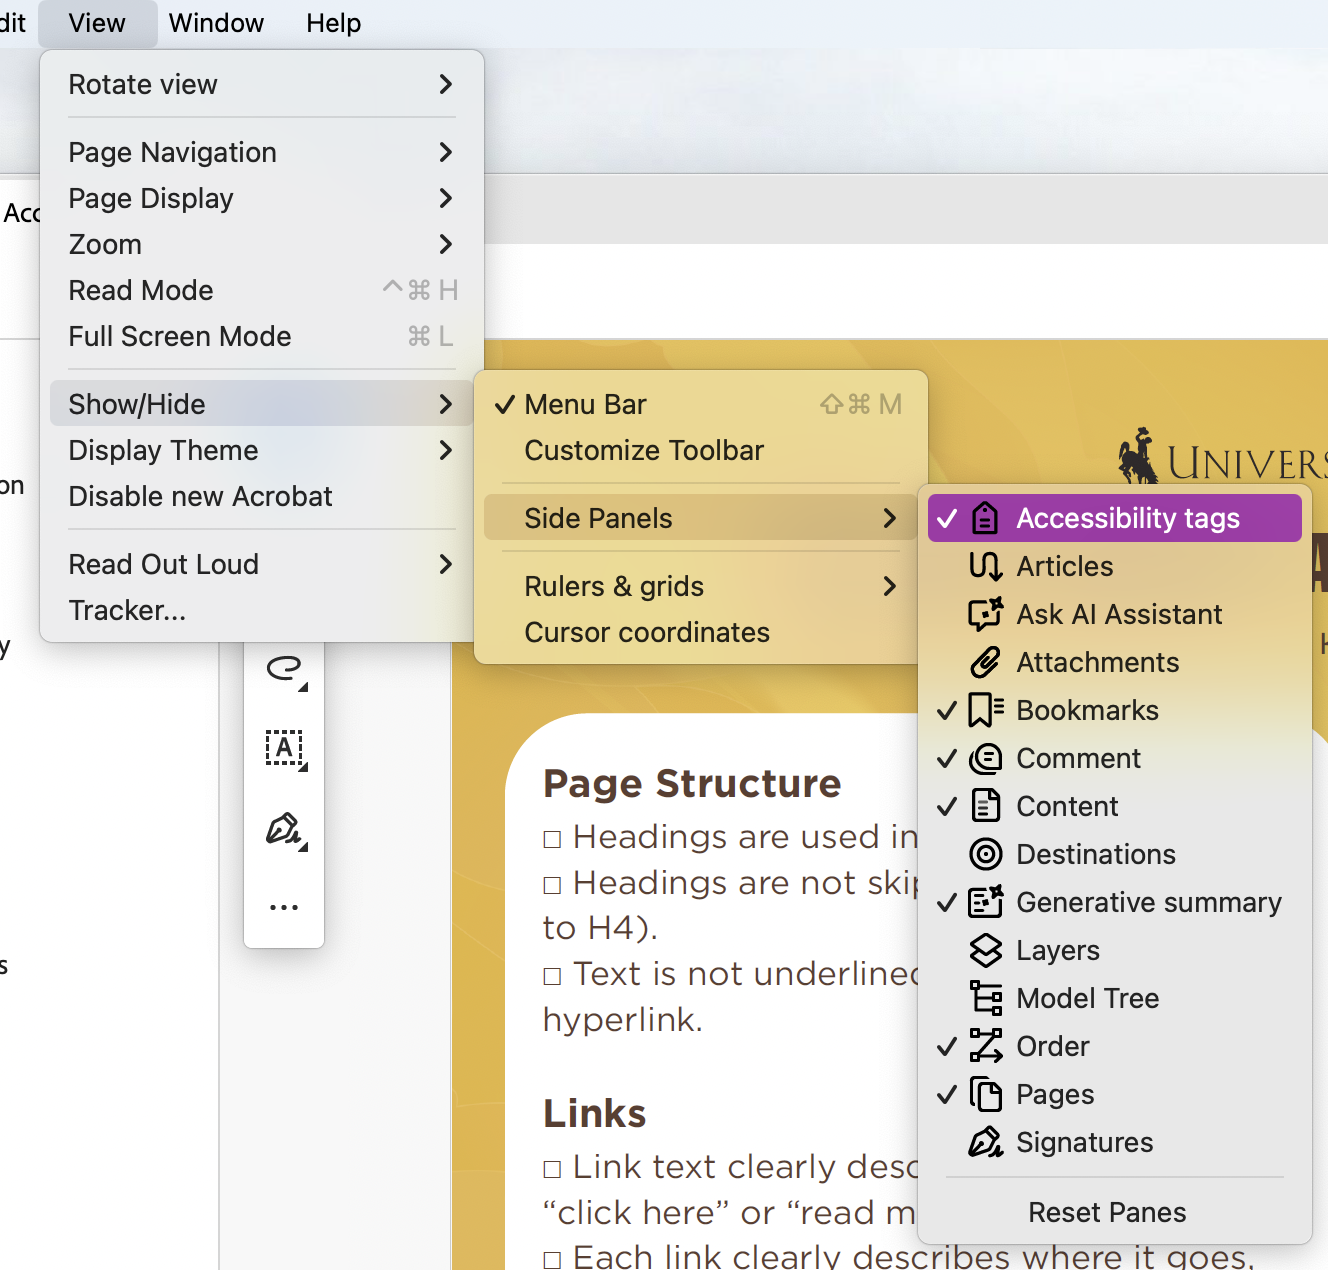
- Windows: Select the hamburger menu → View → Show/Hide → Side panels → Accessibility tags
- Mac: Select View → Show/Hide → Side panels → Accessibility tags
If there are no tags
If you have the original Word/PowerPoint file, the best fix is usually to correct accessibility in the source and export again (recommended).
If you have Acrobat Pro, you can add tags in Acrobat:
- All tools → Prepare for accessibility → Automatically tag PDF
If tags exist but look wrong (Acrobat Pro only)
You can change a tag’s type (example: change a paragraph tag to a heading tag):
- Open the Accessibility tags panel
- Select the tag you want to change
- Use the Options menu (or right‑click / Control‑click) → Properties
- In the Properties window, choose a new tag Type from the dropdown, then close
Important: Viewing tags is often possible in Reader, but editing/fixing tags requires Acrobat Pro.
Tips: If you finds yourself “fighting with tags,” it’s usually faster to go back to the Word/PowerPoint file, run the Accessibility Checker, and export a new tagged PDF; rather than trying to repair a broken PDF.
While the free Adobe Reader cannot fix accessibility errors, it can tell you if your document is tagged correctly.
- Open your PDF in Adobe Reader.
- Right-click (Mac: Control + Click) the sidebar on the far left and select Tags.
- If you see a list (e.g., <Document>, <H1>, <P>), your document is tagged.
- If it says "No Tags available," the document is not accessible. You should go back
to your original Word/PowerPoint file, fix the issues there, and export it again.
While most users can create accessible PDFs using Microsoft Word, you may need Adobe Acrobat Pro if:
- You need to fix a PDF that you no longer have the original Word/PowerPoint file for.
- You are working with complex forms or advanced table structures.
- You need to "OCR" a scanned document to turn it into readable text.
Note: If your job requires you to manage many PDFs, check with your department head about obtaining an Adobe Acrobat Pro license through the University.
Many departments may have licenses for Adobe Acrobat Pro. Please confirm with your department if they already have it. If you could like to get the Pro License, please contact UWIT for support.
If you have access to Pro, you can check your PDF for accessibility issues, get the report of what needs to be fixed and fix it yourself.
Step 1: Open the PDF in Acrobat Pro
Open your PDF in Adobe Acrobat Pro (not Reader).
Step 2: Run the Accessibility Check (Current Acrobat)
Select "All tools" -> Select "View more" ->Choose "Prepare for accessibility" -> Select
"Check for accessibility" -> In the dialog box, select "Start Checking"
Acrobat will display a results panel listing issues as: Passed, Failed or Needs Manual
Check
Step 3: Review the Results
Click each item in the results panel to see details. Some items can be fixed automatically,
while others require you to review the document manually (for example, reading order).
Step 4: Open the Full Report (Optional but Helpful)
In the same area, select "Open accessibility report" for a detailed report you can
save or share.
Need Help Understanding Errors?
Adobe provides explanations for each check and what it means:
Avoid Scanned PDF as much as possible. If your PDF is a scan of a physical paper, it is currently just an image that a screen reader cannot read.
If you absolutely have to use the Scanned PDF, you should process it through OCR (Optical Character Recognition). This converts the document into a readable text for screen readers.
Here are the steps to make your PDF accessible.
- Open the document in Acrobat Pro.
- Select Scan & OCR from your tools.
- Click "Recognize Text > In this file".
- This converts the image into searchable and readable text.
The process of creating a PDF is similar on both devices, but the menu names or buttons may vary slightly:
- Keyboard Shortcuts: On Windows use Ctrl + K for Preferences. On Mac use Cmd + , for Settings.
- Menu Location: On Mac, the menu is at the top of your computer monitor. On PC, it is at the top of the Acrobat window.
- New Upgrade: If your tools are on the left, you are in the "New Acrobat." If they are on the right, you are in "Classic Acrobat." Both have the same accessibility tools under the Prepare for Accessibility or Accessibility menus.
Acrobat Pro has a built-in guide to help you fix common errors. The wizard guides you through essential improvements like adding a title, setting reading order and tagging content.
Here's how to use it:
- Open your PDF in Adobe Acrobat Pro (not available in the free Reader).
- Go to the “Tools” tab and select “Prepare for Accessibility.”
- Click on “Make Accessible.”
Follow the guided steps:
- Add a title and author
- Set the document language
- Run OCR if the file is scanned
- Add alternative text to images
- Set reading order
- Run the accessibility checker
This tool will automatically run and Accessibility Check and at the end, Acrobat will give you a report of remaining issues to fix. Save your updated PDF when done!
LinkedIn Learning
All benefited employees and students have complimentary access to LinkedIn Learning. You can utilize this platform and take the course to learn more about the importance of PDF accessibility and guide to create an accessible PDF.
Creating accessible PDF (video)
Adobe Help Documentation
Adobe has a lot of help documents that are very useful and information for creating documents. Check out the workflow for creating accessible PDFs
The University of Wyoming has earned its Research Level 1 (R1) status from the Carnegie Classification of Institutions of Higher Education, placing Wyoming's only four-year university with the top research universities in the United States.